Scripts & HTML Fields in TOWeb
The source code of your web pages can not be deleted or changed as TOWeb automatically generates or regenerates all your web pages. But you if you have some HTML code or scripts inside you can had them to your topics using TOWeb HTML Script Fields. Depending on your needs you may also Use a TOWeb Text Fields. Both types of scripts can have additional files.
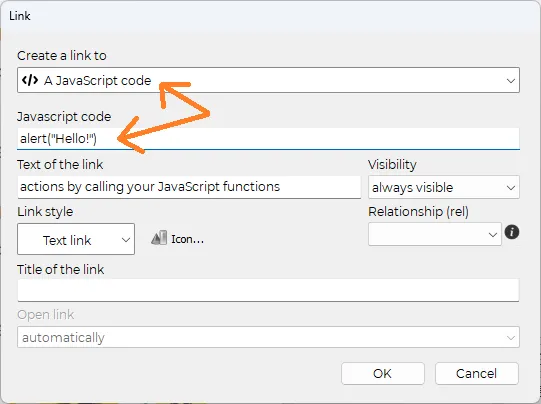
You can insert or edit TOWeb fields when editing a paragraph using the field button ![]() but also create or manage all your scripts from the "Settings > HTML" step.
but also create or manage all your scripts from the "Settings > HTML" step.
Script Fields
The example of %DATE% for the current date in JavaScript.
1) From the Fields' Editor create a new field by clicking on the Add the new field
2) Its default name is NEW_FIELD. Rename it to DATE
3) Set the Field Type to "HTML Script"
4) In the Script Field Content replace the default script with a copy/paste of the following lines of JavaScript source code :
<script>
var d = new Date();
document.open() ;
document.write(d.getDate());
document.write("/");
document.write(d.getMonth() + 1);
document.write("/");
document.write(d.getFullYear());
document.close() ;
</script>
5) Inside one of your topic add the following text :
The current date is : %DATE%
6) Generate and you should see, instead of %DATE% the current date displayed on your web page.
This simple script is just a small example of a JavaScript code displaying the current date. You may create or copy/paste more complex scripts containing HTML, JavaScript, PHP, applets, etc.
If you need to use additional files in the topic for your script (like for instance images, videos or applets) you can add them to the list of additional files.
Where and how to add your Scripts ?
- if your script (CSS, JavaScript, ...) has to be placed into the <head> section of your page, you can do that from the "head" button located in the SEO properties of your topic (or from TOWeb step "Options > Security & HTML > HEAD" if you want that your script to be applied to all pages of your site)
- if your script (PHP and/or JavaScript) has to be added inside the page content and before the </body> tag then just add your TOWeb script field inside the last paragraph of your topic (or inside the page footer if you want your script to be applied to all pages of your site)
- if your JavaScript requires to be called only when the page is fully loaded (eg for JQuery functions if you use this library) then you need to declare a function named onTOWebPageLoaded in which you will copy / paste your code (the name of this function is case sensitive). Below is a small script example that changes the link upon click on the logo of your site to redirect to the Google site instead of going to your home page:
<script>
onTOWebPageLoaded function () {
$('#logo').click( function() { window.location = "https://www.google.com"; return(false); } );
}
</ script>
PHP scripts
If you want to include a PHP script you need to use the Script Field as previously described but also have rename the topic file name with the file extension ".php". By default TOWeb gives to your topic an "Automatic" page name base on the topic title with ".html" extension. To set or change a topic filename, just go to the "Topic settings" and inside the Search engine optimization type your filename with its filename extension before to press the check button aside.
Text Fields
1) From the Fields' Editor create a new field by clicking on Add the new field
2) Its default name is NEW_FIELD. Rename it to ADDRESS
3) Set the Field Type to Text
4) In the Text Field Content replace the default text ("Enter your field text here") by your full address. You may enter it on several lines like for instance :
94043, Mountain View, CA
USA
Now you have created a field ADDRESS containing your address. Every time you will need to use your address in a paragraph of your topics, simply type %ADDRESS% (with % at the beginning and at the name) or insert it where you want with a right-clicking and by selecting ADDRESS from the popup menu.
Then generate your website and this %ADDRESS% will be replace by the address you entered in all the web pages where you use it.
This example uses an email address but you may use text fields for any other purposes and text content you need (a copyright notice, the name of your company, a phone number, your slogan, etc). In fact any text information (short or long) that you may use at different places in your web site but do not want to update every time every where.
Predefined fields
If you want to place links pointing to the page of your site that contains your privacy policy, you can use the %TW-PRIVACY% field inside your texts.
If you use a introduction/agreement page on your site you can use the %TW-SITE-AGREEMENT% field.
In an e-Commerce site, the acceptance text of the sales conditions (modifiable from "Options> Languages > Translate predefined texts > Shopping cart management") can use the %TW-TOS% field to create a link to your Terms of Sales.
If you have a multilingual site in which you use scripts (JavaScript or PHP), you may need to know the language of the page so that your script can perform an appropriate action (such as displaying a message in the correct language, a price in the appropriate currency, a redirect to a specific URL, etc.). To do this, you just need to add the %TW-PAGELANG% field to your script.
Example of use in Javascript
<script>
var lang = "%TW-PAGELANG%";
if (lang == "fr") {
alert ("Bonjour !");
} else
alert ("Hello !");
</script>
Note: the value contained in this predefined script is a 2 characters language code in lowercase letters (eg. en = English, fr = French, it = Italian, pt = Portuguese, de = German, etc).
If the social network buttons are enabled in your section with the choice to use a personalized display then you can use the predefined field %TW-SHARE% anywhere on your page.
You can use one of the 3 predefined fields below to add the year or date of the last publication of your site:
- %TW-YEAR% = displays the year of publication of the site.
This field is particularly useful if you wish to display for example a "copyright 2026" in the footer of your site (as in this current page as well as all the other pages of our lauyan.com website) to avoid having to update it every year - %TW-DATE% = displays the site's publication date in short format.
If the pages of your site are in English, the date displayed will be for example "6/26/2023" (for June 26, 2023) and in French it will be "26/06/2023" - %TW-DATEFULL% = displays the publication date of the site in long format.
If the pages of your site are in English, the date displayed will be for example "Monday, June 26, 2023" and in Spanish it will be "Lunes, 26 de junio de 2023"
The example shown here is of a button using JQuery to alternately make a paragraph content visible or hidden on each click with the following line of code:
p=$("#jsbtnex1").parent();h=p.css("visibility")=="hidden";$(this).html(h?"Show":"Hide");p.css("visibility",h?"visible":"hidden")
The paragraph to show/hide here being the previous "Example 1" which uses a bookmark named: jsbtnext1
Note: if your JavaScript code is quite important, we advise you to use an HTML script field in order to place it in a function. Your function code will then be easier to maintain and can also be reused elsewhere if needed. For example in our previous example all the code could be placed in a ChangeVisibility() function in the following way, less compact but also more readable on several lines
<script>
function ChangeVisibility(e) {var p = $("#jsbtnex1").parent();
if ( p.css( "visibility" ) == "hidden" ) {
p.css( "visibility", "visible" );
$(e).html("Hide");} else {
p.css( "visibility", "hidden" );
$(e).html("Show");
}
}
</script>
and then you just have to enter the line ChangeVisibility(this) in the JavaScript code feld of the button.
Script to open a popup window on your site
When major problems or changes occur on your website, it is important to be able to immediately inform your visitors as soon as they return to your pages. Displaying your information in a popup window overlay can be the ideal solution, especially if you don't want to harm the SEO of your site.
The script we offer here allows you to do this in just 5 small steps :
1 ) Add a new paragraph at the very end of your topic with a content that will be the one you want to appear in a popup window.
2) Modify the Display of this paragraph to Hidden (![]() ).
).
3) Then, in the properties of this paragraph, click on the bookmark (![]() ) icon in order to know its identifier. Note this name by taking into account its case sensitivity because you will have to use it later on. If necessary, you can select and copy/paste its name to temporarily store it for example in the Notepad application on your computer.
) icon in order to know its identifier. Note this name by taking into account its case sensitivity because you will have to use it later on. If necessary, you can select and copy/paste its name to temporarily store it for example in the Notepad application on your computer.
IMPORTANT: The name of the bookmark must be the one originally assigned by TOWeb. If you have modified it, then you need to
- delete the bookmark name that you entered by leaving its name empty and pressing the OK button
- then edit it again to see the original bookmark name you need to copy and use.
4) At the end of your "hidden" paragraph, add TOWeb field (![]() ) that you will name for instance %POPUP% and set its type to HTML Script with the follow content :
) that you will name for instance %POPUP% and set its type to HTML Script with the follow content :
<script>
function onTOWebPageLoaded() {
var popup=$("#fLNWusuK");
popup.attr("title", "Popup Information");
popup.removeClass("span12");
popup.dialog({
modal: true,
buttons: { "OK": function(){$(this).dialog("close"); } }
});
$(".ui-dialog-titlebar-close").hide();
$(".ui-dialog-buttonset").find("button").addClass("btn");return false;
};</script>
5) in the code of this script, finally make the following modifications :
- replace the name fLNWusuK with the one of the bookmark (
 ) your previously get in step #3
 - replace the text "Popup Information" with the one of your choice (it is the title of your popup window)
- replace the text "OK" with the text of your choice such as "Close" if you prefer (it is the label of the button used to close the popup window).
Warning: the script of this example will systematically display the popup window each time the page is opened, which means that if a user visits your page and just a few moments later returns to it, the popup window will be displayed again.
If you want the popup window to appear only once (temporarily or permanently) you will have to modify the script using:
- either a cookie (if you want this duration to be kept only for a specific period in days, months or years)
- or a "localStorage" if you ever want the window to appear only once and never again
- or a "sessionStorage" if you want the window to appear only once during the duration of the user's visit but reappear again the next time this person will return to your site.
The second version of script below has additions indicated in bold using localStorage. You may prefer this version if you want your visitors to see the popup window only once during the duration of their visit but to see it again in the next visits for instance few days or weeks later :
<script>
function onTOWebPageLoaded() {
if( sessionStorage.getItem("popmsg") == "1" ) return;
var popup=$("#fLNWusuK");
popup.attr("title", "Popup Information");
popup.removeClass("span12");popup.dialog({
modal: true,
buttons: { "OK": function(){sessionStorage.setItem("popmsg","1");$(this).dialog("close"); } }
});
$(".ui-dialog-titlebar-close").hide();$(".ui-dialog-buttonset").find("button").addClass("btn");
$(".ui-dialog-titlebar").css("background-color","red");
$(".ui-dialog-titlebar").css("color","white");return false;
};
</script>
By default, the popup window is displayed with a title text in black on a gray background but in the next example below, the two lines indicated in blue have been added to allow the change of a title color in "white" and its background in "red". So if you need to, you can modify with these color names or replace them by the html color values of your choice.
To see an example of a popup information window, click on this button:
This script can be added for example only on your home page.
But if you want it to also appear on the other pages of your site, you will need to use the "duplicate" function to duplicate this hidden paragraph at the end of the other desired pages (and possibly also readjust its content each time to each page concerned if necessary).
The close window button of our examples use the class "btn" (which is the button style defined by default in the Theme of your site) but in your script code you can replace this name there by another one if you want to change its color. The different choices are:
- "btn"
- "btn btn-primary"
- "btn btn-info"
- "btn btn-success"
- "btn btn-warning"
- "btn btn-danger"
- "btn btn-inverse"
- or put nothing if you want a button with a basic style.
- do not use the function name onTOWebPageLoaded() in the script but replace it with another name of your choice such as popupWindow() for example
- add in another (visible) paragraph of your page the link or button that will open your popup window.
For this, you will need to add wherever you want in your page another HTML script field containing:
- either a text link by using the following line of HTML code
<a href="#" onclick="return popupWindow()">Text of the link opening the popup window</a>
Example : Text of the link opening the popup window
- or a button by using the following line of HTML code
<button class="btn" onclick="return popupWindow()">Text of the button opening the popup window</button>
Example :
Risks and tips when integrating third-party scripts into your site
TOWeb allows you to add scripts to your site by using the HTML script fields. But unless you have knowledge of web programming and have developed your own scripts, you will probably use third-party services from another site. And if this is when there can be a big danger, not only for you and your website but also for all your visitors!!!
A classic example, the "scam" of web counters
Very popular before the 2000s, web counters have since fallen out of use for more than a decade. All webmasters or web professionals know this but not beginners, which can make you the ideal victim of a scam because such "so-called free and innocuous" service
- often hides and includes malicious features like for example the appearance of unwanted messages or advertisements on your site,
- or the spying of all the people who visit your site, or other malicious actions without their knowledge
- and even the installation of virus/malware on your web server.
How to do things well
Before integrating a third-party service into your site, it is important to read the conditions of use of the service you intend to add to your site and search the internet for some user reviews. This will allow you:
- avoid the majority of unwanted surprises that you may not have even considered,
- determine the possible cookies and other data collected by this service that you will report to the level of the privacy policy page of your site to comply with the GDPR,
- and in a general way but also for the previous example about "web counters", rather prefer the use of services much more powerful and well known by choosing first those your host provider may offers (if ever they provided web tools/scripts you can use on your account/web server) or by using Google Analytics or other competing alternatives already famous that will bring you much more useful for the SEO of your site thanks to the numerous information and statistics, like for example to know how long the Internet users remain on your homepage (and any other pages), where they come from before visiting your site, or obtain more information on the profile of your visitors (country, age, men/women, ....).
How to proceed if you already used a malicious script
If you have used third-party scripts and notice the presence of completely abnormal behavior of your site when visiting it on the internet (such as the appearance of messages or unwanted advertisements) then:
- Browse through all the topics on your site in order to find and remove all the %SCRIPT% fields that you added to various places and then publish your site entirely. This will verify and confirm that the problem you have comes from there (if it is not the case then you will be able to put them all back and you will have to contact your host for more explanations on the problem you notice.
- If the problem disappears from your site after removing all your third-party scripts then add your script fields again in your pages but only 1 by 1 and republishing your site each time to identify which ones are problematic/undesirable. Remember also to delete the temporary internet files from your web browser after each new publication of your site to be sure that your web browser does not reuse pages/scripts stored in its cache.
- Then contact the company or website responsible for the service (or services) you used to ask them for explanations (without forgetting to re-read the conditions of use of their service).
- If applicable, depending on the answers (or non-responses) of the third-party services that you have used, report the possible fraudulent practice to the authorities that you consider advisable, such as for example certain government agencies/institutions of your country, user forums, antivirus/malware editors, ...
- Make sure you have an up-to-date antivirus to eradicate any spyware and/or malware from your computer before republishing your site.
- Contact your host provider to ensure that absolutely no virus/malware/spyware/trojans has been installed on your account or web server.