Web programming with TOWeb
This page is not an initiation guide to web programming but contains examples allowing users with good knowledge of web programming to learn how they can modify and enrich both the display and behavior their TOWeb web pages by adding their own lines of HTML, CSS and Javascript source code.
Links and buttons with JavaScript calls
The window.print() JavaScript function is used to open the print window in order to print the current page displayed by the web browser. But how to call this function from a link or button?
To do this, simply create a link to "a website" but instead of indicating a site URL, you need to enter the name of the JavaScript function you want to call by prefixing it with javascript: this way:
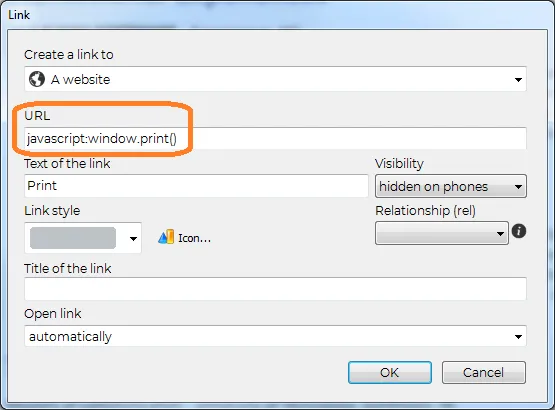
If your script is not just a simple call to an existing JavaScript function but several lines of code then you will have to create your function in an HTML script field that you will name for example myFunction() and the following the following line into the URL field of your link or button:
javascript:myFuntion()
Example of a function that can be used on a button or link for a confirmation request to leave your site and go to Google:
<script>
function myFuntion() {if( confirm( "Do you want to leave this site ?") )
location.replace( "https://google.com" );
}</script>
Use the JQuery library
For example in a link or button using JavaScript (seen in the previous chapter) if you use the following JQuery code
javascript:($this).hide()
this will have the effect of making your link/button disappear as soon as it is clicked.
Be careful, however, if you ever want to use JQuery functions as soon as the web page is opened by the web browser (for instance to perform initialization or content modification operations). In this case, you have to make sure that JQuery has had time to be completely downloaded before being used. And to guarantee this, if you have lines of code or initialization functions to call and these use JQuery, you will have to place them in the predefined function onTOWebPageLoaded() which is called once all the content of the web page was downloaded by the web browser (JavaScript being case-sensitive, be careful to respect the lowercase and uppercase characters of this function name when you use it in your code).
Add your own JavaScript libraries
If you wish to add other JavaScript libraries than JQuery, depending on their use, you will have to either add them in the <head> section or in the <body> section of your pages and as you may want to do that only in a specific page or in all the pages of your site, you will find above the explanations relating to the 4 different possibilities of adding your own scripts with TOWeb:
- either in the <head> section of your topic only concerned.
To do this, you must use the "<head> section and other Meta tags..." button located among the "Search Engine Optimization" properties of your topic. - either in the <head> section of your site from the "Options > Security & HTML" screen so that this is applied to all the pages of your site
- either in any paragraph of a topic (the first one or the last one for example)
using HTML script fields of TOWeb - either in the footer (small or large) of your site if you wish to include it in all the topics of your site that use your Theme by doing this via the HTML script fields of TOWeb.
Note: in the last 2 cases your script will be added after the <body> tag and before the </body> tag
Once you determined where to add your scripts, you can then
- either directly include your lines of JavaScript code by copy/paste (don't forget to place all your code between the start <script> and end </script> tags)
- or include the JavaScript file containing all your lines of code (those you have developed or those of a third-party script that you wish to use).
If you prefer the latter choice of using scripts in ".js" external files, you can do it 2 different ways:
1) either the JavaScript file you want to use already exists on the internet
If your script is available on content servers (CDN) then you just need to include it in the classic way by indicating the full URL of the script and its desired version, as for example below the use of version 3.2.1 of the anime.js script
<script src="https://cdnjs.cloudflare.com/ajax/libs/animejs/3.2.1/anime.js"></script>
2) or you want your JavaScript file to be placed on your web server in order to be used locally by your website. In this case, you must first create an HTML script field with an empty "Field script content" but in which you will have add your JavaScript files from the "Additional script files" tab.
In our example we have created an HTML script field named MY_SCRIPTS in which we have added 2 additional script files: anime.js and gallery.js
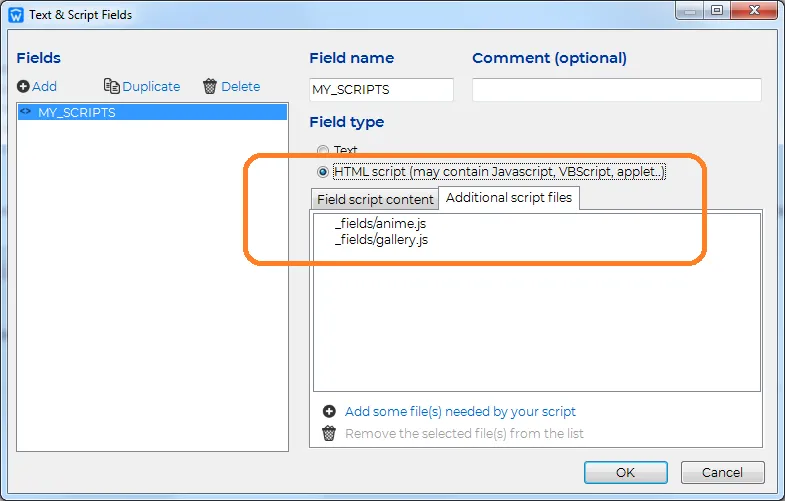
As you can see in the screenshot of our example, TOWeb indicates that our additional JavaScript files are placed in the "_fields" subdirectory of our site. Therefore, to include and use our 2 scripts, we just have to add these 2 lines of code:
<script src="_fields/anime.js"></script>
<script src="_fields/gallery.js"></script>
IMPORTANT: your HTML script field containing additional files must be used at least once in one paragraph of any topic of your site because if your script is not declared anywhere in your site, the additional files it contains will be considered as not used and will therefore not be published.
In our example, this means that we must add the full name of the %MES_SCRIPTS% field somewhere in the text content of a paragraph on our site so that our 2 additional JavaScript files can be published in the _fields directory of our web space and be used locally by all the pages of the site (and not just the one where the HTML script field has been added).
Add your own CSS3 styles
- either in the <head> section of your topic. To do this, you must use the "Section <head> and other meta tags..." button located among the "Search Engine Optimization" properties of your topic,
- or in the <head> section of your site from the "Options > Security & HTML" screen if you want your CSS styles to be applied to all the pages of your site.
The ClaudiaMinton template is an example to illustrate a web page CSS customization so we invite web developers to create a test site from this template to get the source code present in the <head> section of its CV home page.
The CSS programming aspects will not be detailed here but only the techniques presented in a global way to show how this page was made.
- The CV page does not use a theme, nor any header, menu or footer so in order not to interfere with the styles of the theme (used by all the other topics of this template), this topic is the only page to use a side panel and also to use paragraphs with "custom" CSS styles (defined in the CSS editor and that can be applied to a paragraph of a section at the level of its "Style" property).
- The sidebar is placed on the left (using the option of the CSS editor located in "Site > Page > Page Content > Topic > Sidebar") and various additional styles are applied to it in our CSS code in order to apply some CSS "flex" display properties (not currently supported by TOWeb) in the sidebar (with its id called #top-sb) for behavior appropriate to the needs of this page.
- Finally, the main CSS modifications are made to the "twps-cst1" class (called "custom 1" style in TOWeb) which is the one used for the gray horizontal paragraph displayed at the top of the page.
Because indeed, as you can see in design mode in TOWeb, the sidebar and the normal paragraphs of the topic are separated by a spacing that we do not wish to have, in order to have this top gray paragraph "glued" to our blue sidebar, a displacement of its position as well as a resizing is added by CSS.
In addition, in this paragraph we also have the 2 buttons (Print and PDF) placed in its title but for a better presentation a CSS code have been added to align them in the upper right corner of the paragraph.
Dynamically add styles or HTML5 code
The modification of the styles of your web page elements can also be done dynamically in JavaScript or JQuery just like the rest of your HTML content by adding your lines of code in an HTML script field placed in your page. The different ways to do this and all the possibilities will not be covered here but you will find below a small example using JQuery to illustrate a change of CSS display style as well as a change of HTML content in a page of a site created with TOWeb.
1) delete the page footer (if it exists) or more exactly replace its content with an empty HTML code using our deleteFooter() function
2) if the footer existed and was replaced, then all the buttons present in the TOWeb web page will be enlarged by 150% by calling our bigBtn() function
<script>
function deleteFooter() {
if( !$("footer") )
return false;
$("footer").html("");
return true;
}function bigBtn() {
$(".btn").css( "zoom", "150%" );
}
function onTOWebPageLoaded() {if( deleteFooter() )
bigBtn();
}</script>
Avoid conflicts with the TOWeb design mode
In design mode, adding your own CSS or JavaScript code can cause TOWeb to run slower or not display your content correctly or even cause crashes. For these reasons we therefore recommend:
1) to uncheck the option "use your additional code in design mode" located in the "Options > Security & HTML > HEAD" screen in order to avoid slowdowns, conflicts or even crashes when editing your topics in TOWeb
2) to use the external preview (F12 key from TOWeb) to test your pages directly in your web browser and check the display and the proper functioning of your scripts. If your additions are not in HTML, CSS or JavaScript but in PHP, you will need to publish your site on your web server to test your pages.
Other examples and functions
If you are creating a multilingual site, you can use one of the predefined script fields such as %TW-PAGELANG% which contains the language code of the current page. Using this value in your script (JavaScript or PHP) will allow you to perform any processing specific to each language in your web pages.
★ Alert popup windowThe javascript alert() function allows the web browser to display a message in a window to visitors of your site, but its presentation is not very pretty, it also differs depending on the web browser used and is not integrated into your site. So if you want an alternative to that, you may consider displaying the content of an entire paragraph using a popup alert window fully integrated to your site.
★ AnimationAt the end of the year, if you want to add a falling snowflakes animation above the content of your web pages, then you can add our falling hearts or snowflakes animation script to your site.
★ Custom ordered listOur CSS generator of custom ordered list allows you to create different shapes, colors and styles for your ordered lists. The generated CSS code is simply to be copied & pasted in the <head> section of your topic and thus allow you to highlight the different steps or important points of your page content like for instance on our own site with the list of the 10 key points of TOWeb.