Navigation & Structure of your website
- Text Links & Buttons
- Bookmarks
- Protection of email addresses
- Links on Pictures
- Menu of your website
- Additional links to the main menu of your site
- Footer, Fatfooter or Sidebar as a menu alternative
- Publicize the web addresses of your paragraphs
- Articles
- Groups of topics
- Topics with no navigation
- Back to top button
- Social Network Buttons
- Local menu of a Topic
Text Links & Buttons
When editing a text use the link button ( ![]() ) to create a link inside a button or just a text link by selecting the "Link style". A link can be one the following type :
) to create a link inside a button or just a text link by selecting the "Link style". A link can be one the following type :
- a link to another website : where you need to enter the URL (http:// or https//:)
- a link to email address : this will open the mail software of your visitors if any mail software installed
- a link to topic of your site that can go to the start of the page, a specific paragraph, a specific picture (if your topic is an album) or a specific product (if your topic is a catalog)
- a link to a file : using this function your file will come available for download by this link for any of your visitors. From version 6, all download links from your site are using a script that directly saves the downloaded files in the download folder users' computer. And from version 8 you can also have statistics on the number of downloads of your files (Options> i-Services> Download Counters). If you wish that your download links do not behave like this but instead directly opens the file into the user's web browser (like in version 5 or older) or in side another software (if the user has one on his/her computer that can open the types of files you propose on your site), then you just need to disable the i-service file download from step "Options > i-Services". For more information on how to create a link to file please watch the video tutorial : create a file download link
- a link to a phone number so that a visitor using a smartphone can directly dial the number by clicking on it.
- an SMS link allowing mobile users to reach you directly by SMS with a simple click. You can also enter any predefined message like for instance "Request about product information X" by placing such SMS link into your product page X
Whenever you create a link you can define the relation between the targeted page and the page where your link is placed. The most commonly used values, as exploited by internet search engines such as Google for SEO of your site are:
- next : indicates your current page is a subset of a document/topic/article and that target link is the next part
- prev : indicates your current page is a subset of a document/topic/article and that the target link is the previous part
- nofollow : indicates that you (the author of the site or topic) do not condone the content of the targeted link. By assigning the value "nofollow" to the property "rel" of a link, you are telling the search engines like Google not to follow certain links on your site or not forward the popularity of your page to this other linked page/site in order not to be associated with this site and/or you do not condone any possible remarks or contents of this third-party site that you specify in your link (for example because this site may be a spam site or disreputable and you do not to be associated to that)
- author : a link to the author of the current topic or document
Note : to add a new line after a link and especially a link place inside a button just move the cursor after the last character of your text (but still inside the button) and type a character like for instance a space key to get "out" of the link (button) and then press the Enter key to create a new line. On the opposite if you want to add a new line before a button link move the cursor just before the first character of your text link (but still inside the button) and press the space key.
Bookmarks
A bookmark is a name (generally a short text) to directly access a paragraph inside a page. By giving a bookmark with an appropriate name and meaning related to the content of the paragraph, this will allow users (and you too) to remember more easily the URLs of the most important parts of your site and this may also contribute to a better referencing of your pages at the level of the search engines.
By default, TOWeb assigns a random alphanumeric bookmark name to a paragraph. You can leave like that or change it by clicking on the icon ( ![]() ) accessible from the "paragraph layout" options of each paragraph but also available when adding a new paragraph (since version 11) . The name of the bookmark you assign to a paragraph must be unique per page (no duplicate allowed).
) accessible from the "paragraph layout" options of each paragraph but also available when adding a new paragraph (since version 11) . The name of the bookmark you assign to a paragraph must be unique per page (no duplicate allowed).
It is particularly advisable to specify a bookmark name in the following cases:
- when you use a local menu in your topic or additional links to the main menu of your site
- when you want to communicate to people (for example by email) a direct link to a specific paragraph of a page of your site. Assuming, for example, that you have a site www.mywebsite.com and that you set a bookmark "services" to a paragraph of a page named "prices.html" then the direct address to this paragraph you need communicate will be this one:
https://www.mywebsite.com/prices.html#services - when your paragraph does not necessarily have a title and adding a short additional text as a bookmark will provide more sense and help search engines such as Google to better under its content.
Protection of email addresses
Spam robots analyze the content of sites looking for email addresses and mainly those contained in your links more reliable than anywhere else. With a version 6 or higher, TOWeb protects and encrypts the href links of your addresses to make them unusable by spam robots and other search engines.
However, if you enter your email address also in the text of the link (i.e. its label) or even as plain text inside a paragraph, this text will be readable, unprotected and exploitable by all. To reinforce your protection against spam, you may then want to follow our important advice and remarks:
- in an email link, you may prefer the use of a text link such as "Contact Me" rather than re-enter your email address in plain or possibly indicate the text of a "falsified" email address which will remain humanly intelligible like for example by adding additional space characters: c o n t a c t @ y o u r s i t e . c o m
- or use not just 1 email link but 2 email links placed next to each other. This way you will have 2 links having the same (protected) email address but using different texts: the first link containing just the first part "contact" of your address, the second link with the text "yoursite.com" but also using the @ icon (and no longer the "@" character). This icon can be added from the button (
 ) located in the TOWeb link window and it can be placed to the left or to the right of the link text, as for instance here on the left of this example: contactyoursite.com
 - or prefer the use of a contact form protected by captcha. This way you will keep your email address completely secret from everyone (it will only be known to users or robots if you reply to messages sent from on your website's forms)
- and if you enter your email address not in a link but inside a paragraph text then use the button ( ) located in the edit bar to add the @ icon (available in the list of symbols proposed by TOWeb) in order to replace the @ character.
Finally, there is no absolute protection over time against spam robots, some may even go so far as to analyze the content of images of your site looking for email addresses sometimes displayed inside them. But to make this risk "almost zero", the best practice is to display as little as possible your email address in plain text on your site (nor even not at all, including in images) because if a human can read it then a robot will also be able to do it someday...
Links on Pictures
Menu of your website
The edit menu button ( ![]() ) located in the top toolbar opens a window from where you will be able to organize your topics and your website menu. The list one the left side is the one of the topics that will appears in your menu. The list on the right side the topics that will not be displayed in your menu. A topic not displayed in your menu does not means it doesn't nor wont be accessible. In fact this topic will exist and be published but you will need to add links on it somewhere else inside your web pages the access to make it accessible by visitors.
) located in the top toolbar opens a window from where you will be able to organize your topics and your website menu. The list one the left side is the one of the topics that will appears in your menu. The list on the right side the topics that will not be displayed in your menu. A topic not displayed in your menu does not means it doesn't nor wont be accessible. In fact this topic will exist and be published but you will need to add links on it somewhere else inside your web pages the access to make it accessible by visitors.
You can change the order of your topics in the list or move them from one list to the other by drag'n drop and/or by using the move up/down arrows and hide/show buttons.
To create a submenu in your menu use the "Add submenu" button and then drag'n drop the desired topics into it.
Finally if you have multiple sections that link between it and dealing with the same subject then you can group them into groups of topics or articles.
As for customizing the display of your menu it must be made from step "Theme" by clicking in the preview of your menu to access its styles properties, but also:
- to set the folding behavior of the menu based on the screen width (especially for smartphones/tablets) with the ability to eventually let it always or never folded
- to present a folded menu either as a text or an icon
- to automatically open submenus mouseover without the visitor having to click
Additional links to the main menu of your site
Since TOWeb V7 it is possible to add additional links in the menu of your site, links pointing directly to paragraphs of a topic by activating the option "Additional links" (option only available for topics of "Page" type, this does not apply to albums or catalogs). By choosing this you can activate or deactivate the additional direct links to the paragraphs of your choice to make them appear or not in the general menu of your site among all the other links. A double-click on the names in the list of the paragraphs will allow you to edit them and changes the default names given by TOWeb. Also remember to assign bookmark names at the paragraph level to which you put links in order for your URLs to appear clearly in web browsers.
Using additional links can be particularly useful:
- if you want to create a single-page website (a page that can have a fairly long content) but still have a menu to directly access the main sections of your page
- if you have a website with few topics and want the navigation to be done mainly thru your home page (by adding by yourself buttons/links to other pages)
Note: if you want to do a single-page site (or have a home page that gives your site the looks of a single-page site), you may also consider the solution of using a local menu on your topic.
Footer, Fatfooter or Sidebar as a menu alternative
Menu of your website will only have a one level of submenus. If you need more you might consider either :
- to use a sidebar and add panels (
 ) on it that a specific topic will contained links buttons to other topics (not visible in your menu). This way you sidebar will become a submenu specific to your topic.
 - to add a list of links inside your footer or fat footer. These will be visible on every pages of your website (like your menu) but at the end of every web pages. You can then use the footer and/or fatfooter as another way to present your menu or a complementary way by placing for example the most important topic in your menu and the less important ones in the footer or fatfooter.
- to add articles or groups of topics to your menu.
Publicize the web addresses of your paragraphs
Websites visitors may sometimes be more interested in a specific paragraph on a page than the rest of it. In order to help your visitors know and keep the direct link to some paragraphs and thus be able to quickly return to what interest them, an option available since version 11 can be activated on your site from the TOWeb screen: Options > Website navigation > Button "Paragraph link".
By using this option, a link button ( ![]() ) will appear when hovering over the paragraph titles of all your website pages. Your visitors will therefore only have to click on this button to either copy to their clipboard or display the complete address of the paragraph (including its bookmark) in their web browser in order to keep it or add it to their favorites.
) will appear when hovering over the paragraph titles of all your website pages. Your visitors will therefore only have to click on this button to either copy to their clipboard or display the complete address of the paragraph (including its bookmark) in their web browser in order to keep it or add it to their favorites.
If you wish, you may also deactivate this feature only for certain topics of your site by unchecking the option "Show the paragraphs' link button" located in the topic options.
Articles
An "article" in TOWeb is a set of pages that are ordered and linked by a navigation system. TOWeb offers several automated navigation systems that can be used in the pages of an article: a navigation summary with a list of links, a drop down list of the pages or a simple page navigation thru previous & next buttons. The navigation system of your choice can be placed at the beginning of each page and/or can be placed at the end of each page if you like too. The creation of an article can be done manually from your menu management window by drag & drop of your pages inside your article or take them out or change their order. An can also be created using the TOWeb assistant accessible from the button ( ![]() ) "create a new topic". In TOWeb, when editing a topic that is part an article, a toolbar appears over the navigation system to allow you to edit or delete the article but also directly add a new page into your article or perform a complete or partial removal of your article directly from there.
) "create a new topic". In TOWeb, when editing a topic that is part an article, a toolbar appears over the navigation system to allow you to edit or delete the article but also directly add a new page into your article or perform a complete or partial removal of your article directly from there.
Groups of topics
A group (or group of topics) is a front page automatically created by TOWeb containing a brief summary of all the desired topics with links to them.
A group can be created and modified manually from the menu of your management window by performing drag'n drop of your topics to add or remove or change them into the group. Add a group can also be carried out in an assisted way from the button ( ![]() ) "add a new topic".
) "add a new topic".
A group (with customizable text) can help you quickly create web pages of type "portal" thus preventing you from having to create all the links yourself, helping you to have a basic content (images & texts) already pre-filled to present your topics and prevent you from having to manage their invisibility in the site menu (as topics part of a group will not be directly displayed in the menu of your site). Only the name of the group of topics appears, which can help you to reduce and simplify your menu if it ever become too important.
From version 11, the possibility of using dates, authors and keywords but also more presentation options allows you to create portal sections for blogging as well as filtering their content.
Topics with no navigation
This option, located in the settings of each topic, you can view the contents of your entry without any navigation elements of your site (no menu, no search box, no footer). This function can be used for example in case you want to create a front page with a navigation only restricted to the links you have placed into the paragraphs of this topic or if you wish to create an agreement/introduction page of your site.
Back to top button
Enabled by default on your site, this button is automatically displayed superimposed in the lower right corner when the user performs a significant scroll down inside a page of your site, enabling him/her to quickly return to the beginning of page and the menu of your site. You can disable or enable this function on your site from the step "Options > Site Navigation" and customize its options (the trigger level, the selection of the button icon and its size).
Remark: the style of the "go back to top" button that you choose will also be the same as the one allowing to "scroll down" when using a local menu on a topic and if the first paragraph of this topic also has the "full height" option activated. In addition, if you disable the display of the "go back to top" button on your site then you will also automatically disable all buttons to scroll down (and vice versa if you activate it).
Tip: For the triggering threshold, it is advisable to set it to a value that corresponds to the height where the content of your topics start. In such a way when the user will scroll down on your page, as soon as the menu of your website becomes no longer be visible, this button will be displayed.
Social Network Buttons
TOWeb provides 2 types of social network buttons
- the ones displayed on every pages of your website located in your Theme
- the ones that can be placed on paragraphs of your topics using the "Social buttons" located in "topic settings". By activating this option or clicking on its "configure" link, you will be asked to configure them.
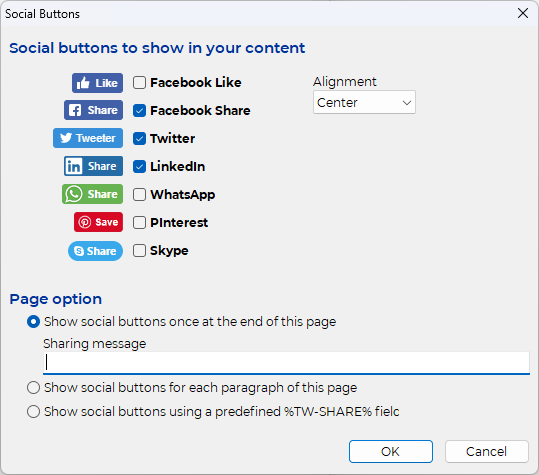
IMPORTANT : Social media buttons will only display and/or function properly for your visitors if they accept cookies both in their web browser and in your site's cookie consent. In addition, concerning the "Facebook Like" button, this button also requires your visitors to be connected to their Facebook account before visiting your pages in order to be able to see and use the "Like" button.
Note: using the %TW-SHARE% predefined field allows you to add your social buttons in a specific paragraph of your topic rather than at the end of the page.
Local menu of a Topic
A local menu is a menu only containing links pointing to the paragraphs it contains. Applying a local menu to a topic implies not using either the site theme nor the main menu of your site. That's why in the options of a topic, you will have to activate the 2 options "No navigation" and "No theme" to be able to use and configure it. The links to the paragraphs of your pages will appear next to the title of your page in a local menu bar with customizable styles (differently and more basic compared to the possibility of the CSS editor for a site main menu, but easier to handle and configure) .
Apart from the styles that apply to the paragraph content of a page, the only theme element that can be preserved in a page using a local menu is the page footer (unless you check the "No footer" option). Keeping the footer can be useful if you want to be able to place on it for example links to other of your topics or if you want to be able to display certain elements of your theme (such as social buttons, the search field of the site, links to the different languages of your site, ...) provided of course to have moved these elements into the footer of your theme (if not already there).
Using a pop-up menu can be particularly useful:
- if you want to create a single-page website (a page that can have a fairly long content) but still want a menu to directly access the main sections of your page
- if you have a homepage with a style completely different to the rest of your site
- if you are not comfortable yet to use or customize your theme as you want from the CSS editor and prefer not necessarily to respect a very strict and same presentation for all your pages but have some with their own styles (based on background images for example) or with a "page by page" navigation using your own links / buttons instead of a menu
Note 1: If you want to do a single-page site, you may also consider the option of adding additional links to your site's menu. The 2 methods bring their options and advantages, the main difference being that the additional local links will use the main menu and the theme of your site in its entirety while the solution of a local menu will not use any global menu, or any borders, images, header of your theme.
Note 2: You can use a local menu without leaving any links to it. The title of your topic will then be alone and displayed in the local menu bar, with still all it different options to configure it (choice of a background color with or without transparency, border with shadow, ...).